
Enhancing the Natural Grain of a Floating Wood Shelf With a Clear Finish
Enhancing the natural grain of a floating wood shelf with a clear finish starts by selecting top-quality wood, such as Maple, Alder, White Oak, or Walnut, known for their distinct grain patterns.
Begin by inspecting the wood for any imperfections or interesting characteristics like knots and swirls. Then, carefully sand the wood surface to ensure it is smooth before applying a clear finish.
Opt for wipe-on polyurethane for its user-friendly application and excellent protective qualities. By allowing each coat to dry properly and sanding between applications, you can achieve a flawless finish.
Attention to the smallest details ensures outstanding results and further enhances the shelf's natural beauty.
Key Takeaways
- Opt for wood varieties like Maple, Alder, White Oak, or Walnut to showcase unique grain patterns that stand out.
- Thoroughly sand the wood surface to achieve a flawlessly smooth finish that enhances the natural wood characteristics.
- Prior to staining, use a wood conditioner to ensure an even application of the stain and to accentuate the visibility of the wood grain.
- Opt for clear finishes such as polyurethane or water-based acrylic to both protect and accentuate the natural grain of the wood.
- Between each coat of clear finish, lightly sand the surface to maintain a professional and smooth appearance that highlights the wood's beauty.
Selecting the Right Wood
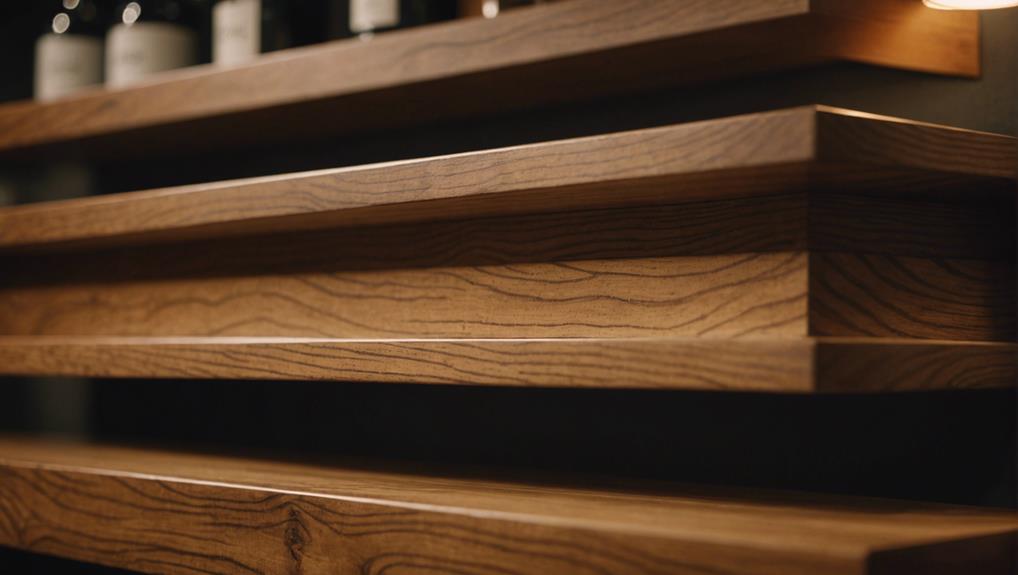
Choosing the perfect wood for your floating shelf is essential to enhance its natural beauty and unique features. There are various wood options available, each with its distinct grain patterns and colors that can completely transform your space. From the charming rustic appeal of pine to the elegant sophistication of walnut, the choice of wood plays a crucial role in achieving the desired look.
Maple, alder, white oak, and walnut are popular wood types known for their individual characteristics. Maple, with its fine and consistent grain, offers a sleek and contemporary appearance. Alder, featuring a subtle grain and warm tones, creates a cozy and welcoming atmosphere. White oak exudes a timeless charm with its strong grain patterns and durability, while walnut stands out with its luscious dark tones and striking grain designs.
Applying a clear finish to these wood types enhances their natural grain features, adding warmth, texture, and personality to your floating shelves. By selecting the right wood, you ensure that the inherent beauty of the grain is highlighted, elevating the overall look of the shelf and enriching the ambiance of the room.
Inspecting the Wood Grain
When inspecting the wood grain, we first identify the unique patterns like swirls and burls that give the wood its distinct character. It's crucial to evaluate the wood quality and take note of any flaws that could impact the final appearance of the shelf. By showcasing these distinctive characteristics, we can select the optimal staining and finishing techniques to enhance the natural beauty of the wood.
Exploring the various grain patterns allows us to appreciate the craftsmanship and artistry involved in creating floating wood shelves. Each swirl and burl tells a story of the tree's growth and adds a touch of elegance to the finished product. By carefully examining these details, we can ensure that the shelf isn't only visually appealing but also structurally sound for long-lasting use.
Incorporating the right staining and finishing tools is essential to bring out the best in the wood grain. By choosing the appropriate techniques, we can highlight the natural beauty of the wood and create a stunning floating wood shelf that complements any space. From sanding to sealing, each step plays a crucial role in enhancing the overall aesthetics and durability of the finished product.
Identify Grain Patterns
When enhancing a floating wood shelf, it's essential to start by examining the wood grain to identify its distinct patterns and characteristics. Understanding these patterns is crucial as it allows us to predict how the clear finish will interact with the wood surface, ultimately enhancing its natural beauty.
During the inspection of the wood grain, focus on:
- Color Variations: The presence of different shades within the wood can accentuate its organic beauty. Recognizing these variations will help in applying the clear finish more effectively.
- Texture: The texture of the wood grain can range from smooth to coarse. Being aware of these textures ensures that the clear finish complements the grain rather than masks it.
- Direction: The direction of the grain can significantly impact the overall look of the shelf. Understanding whether the grain runs vertically, horizontally, or in a more intricate pattern aids in planning the application of the finish accordingly.
Assess Wood Quality
Now that we've pinpointed the grain patterns, let's assess the quality of the wood by examining its distinct characteristics and any potential flaws. The natural allure of a floating wood shelf is often highlighted by the grain of the wood, so it's crucial to carefully analyze these features. By closely observing, we can identify unique swirls, burls, or variations in color that can elevate the shelf's visual appeal.
It's essential to also inspect the wood surface for any defects or irregularities that could affect the staining process or the final finish. Addressing these imperfections early on is key.
Additionally, determining the direction of the wood grain is crucial. Ensuring a consistent and uniform application of the clear finish is essential to achieve the seamless look we're striving for.
Furthermore, the choice of wood species used significantly influences how the wood absorbs stains and finishes, ultimately impacting the shelf's overall appearance. Different wood types have varying absorption rates, which can either enhance or detract from the final aesthetic of the product.
Highlight Unique Features
Let's closely examine the wood grain to uncover and showcase distinctive features like rugged knots, elegant swirls, and captivating color variations that bring personality to our floating shelf. These natural imperfections, such as sapwood and burls, can significantly enhance the visual allure of our project, telling a unique story of the tree's growth and adding an unparalleled touch that sets it apart from mass-produced pieces.
In our scrutiny, we'll pay attention to:
- Knots: These charming formations occur where branches once sprouted, imparting a rustic appeal and visual intrigue to our floating shelf.
- Swirls and Color Variations: Ranging from subtle to striking, these patterns create a rich palette of hues that a transparent wood finish will enhance magnificently.
- Sapwood and Burls: Often seen as flaws, these characteristics introduce texture and complexity, ensuring that our wood stands out as truly exceptional.
Preparing Your Workspace
To get started with setting up our workspace, let's arrange our essential tools and ensure they're easily accessible. This will help us maintain a smooth workflow without any unnecessary interruptions during the finishing process.
It's crucial to tidy up the surface meticulously, eliminating all traces of dust and debris to prevent any flaws in the clear coat application. These initial steps are vital in creating a pristine and flawless appearance for our floating wooden shelves.
Organize Your Tools
Let's gather the necessary tools and materials for our floating wood shelf project:
- Electric Sander and Sandpaper: An electric sander with 120-grit sandpaper for the initial sanding process.
- Clear Coat and Stain: These finishes will enhance the natural grain and color of the wood.
- Personal Protective Equipment (PPE): Safety goggles, dust masks, and gloves for protection during sanding and finishing.
Organizing these tools beforehand ensures a smooth workflow and minimizes interruptions.
A clean, well-lit workspace with ample room for maneuvering the shelf is essential. This environment allows us to focus on applying the clear coat evenly, showcasing the wood's beauty.
Let's start by setting up our tools and creating an efficient workspace.
Clean the Surface
Now that our tools are neatly arranged and our workspace is prepared, it's time to ensure the wood surface is impeccably clean for a flawless finish. To begin, we must eliminate any dust, debris, or flaws from the wood surface. This thorough preparation is crucial for the clear finish to adhere properly and highlight the wood's natural grain.
We'll start by using an air compressor to blow away loose particles, ensuring even the smallest bits are removed. Following that, we'll delicately wipe down the entire surface with a tack cloth. The tack cloth is specifically designed to capture fine dust that the air compressor might overlook. For those tricky corners, a damp rag can be quite effective, but it's essential to ensure the wood surface is completely dry before moving on.
It's also important to round off any sharp edges. This step not only enhances safety but also allows the clear coat to cover the edges more effectively, resulting in a professional-looking finish.
A pristine, dust-free setting is vital during this process. By guaranteeing that the wood surface is spotless, we lay the foundation for a smooth, clear finish that accentuates the natural grain, showcasing our attention to detail.
Sanding the Wood Surface
Sanding the wood surface plays a vital role in creating a flawless base for finishing your floating wood shelf. It helps in removing any imperfections and ensuring a smooth and even surface, enhancing the natural beauty of the wood once the finishing coat is applied. By carefully sanding the surface, you can eliminate rough spots and inconsistencies, allowing the wood's grain to stand out beautifully.
To achieve the best results, it's essential to follow a systematic approach to sanding. Begin by using a 120-grit sandpaper for the initial sanding process. This grit is ideal for addressing any major imperfections and rough spots, laying the groundwork for a refined finish.
As you progress, switch to a 150-grit sandpaper to further smooth out the surface and bring out the wood's natural beauty. This step helps in refining the surface and preparing it for the final touches.
Lastly, finish the sanding process with a 180-grit sandpaper to achieve a perfectly smooth surface. This final step ensures that the wood is ready for the finishing touches, resulting in a professional and polished look for your floating wood shelf.
Remember to always sand with the grain to maintain an even surface and avoid any scratches. This meticulous sanding process is crucial in showcasing the natural grain of the wood and achieving a stunning finished product for your floating wood shelf.
Choosing Sandpaper Grits
Choosing the right sandpaper grits is crucial for achieving a smooth and polished finish on your floating wood shelf. We begin with 120 grit sandpaper to get rid of any rough spots and imperfections. This initial sanding step is essential for setting the stage for a flawless final finish by eliminating surface inconsistencies and preparing the wood for the next sanding stages.
Moving on, we switch to 150 grit sandpaper to further refine the surface while maintaining control over the wood removal process. This step helps to smooth out the wood, making it more receptive to the clear, protective finish that we'll apply later on.
When working with live edge wood, using a 150 grit sanding sponge is ideal as it helps to preserve the natural shape and texture while ensuring a consistent finish.
Cleaning the Sanded Surface
Now that we've achieved a smooth surface with our selected sandpaper grits, it's essential to thoroughly clean the wood before applying any finishing touches. This step is crucial to ensure that the clear coat adheres properly and results in a flawless finish. Leftover dust particles can negatively impact the final look, so let's dive into the best methods for cleaning our wood shelf.
To start, it's important to round off the sharp corners on the shelf. This not only improves safety but also helps the clear coat adhere better. Once the corners are taken care of, we can proceed to the cleaning process.
There are three effective tools we can use to ensure a dust-free surface:
- Air Compressor: An air compressor is a quick and efficient way to blow away dust. It can reach into crevices that a cloth might miss, ensuring thorough cleaning.
- Tack Cloth: A tack cloth is ideal for picking up fine dust particles. Its sticky texture guarantees that no dust is left behind, which is crucial for achieving a smooth finish.
- Damp Rag: If a tack cloth isn't available, a damp rag can also do the job. Just remember to let the wood dry completely before proceeding with the clear coat application.
These tools will help us prepare the wood shelf for finishing, ensuring a clean surface that's ready for the next steps in the process.
Applying Wood Conditioner
Ensuring a flawless and even finish on our floating wood shelf starts with applying a wood conditioner. This step is crucial for prepping the surface, as it allows the wood pores to be properly penetrated and sealed. By doing so, we set the stage for an even stain application, preventing issues like blotching and uneven absorption that can detract from the shelf's aesthetic appeal.
When working with softwoods such as pine, maple, and alder, the wood conditioner plays a vital role in prepping the surface. It not only enhances the natural grain but also brings out the wood's inherent color, highlighting its unique details. This process is essential for achieving a professional-looking finish that truly stands out.
Furthermore, the wood conditioner significantly improves the overall appearance and durability of our floating wood shelf. By creating a more uniform surface, it allows for a smoother application of subsequent finishes, ensuring that our project exudes quality and craftsmanship.
Selecting a Wood Stain
Selecting the right tools for finishing our floating wood shelf is crucial to achieving the desired look that enhances the natural beauty of the wood. The tools we choose play a significant role in highlighting the wood's grain and texture, ultimately transforming the shelf into a stunning piece that complements our space. Careful consideration of the tools will greatly impact the final outcome, so it's important to make informed decisions.
Tools such as sandpaper, wood stain, brushes, and a protective finish are essential for the finishing process. Sandpaper helps smooth out the wood's surface, preparing it for staining. When selecting a wood stain, opt for ones like light oak, walnut, ebony, or dark walnut to add sophistication, warmth, or depth to the shelf. Brushes are used to evenly apply the stain, while a protective finish like polyurethane helps seal and protect the wood from damage.
When choosing tools for finishing our floating wood shelf, there are three key factors to consider:
- Wood Type: Different wood species have unique characteristics, so understanding how the tools interact with the wood's properties is essential for a successful finish.
- Application Technique: The way we apply the stain and protective finish can impact the final look of the shelf. Experiment with different techniques to achieve the desired color intensity and sheen.
- Room Decor: Consider the overall design and aesthetics of the room where the shelf will be placed. The tools chosen should harmonize with the room's style, enhancing the shelf's role as a statement piece in the space.
Staining the Wood Grain
Now that we've our tools ready, let's dive into the art of enhancing the natural beauty of wood grain through staining. Staining wood is a skilled craft that allows us to bring out the richness and depth of the grain, transforming an ordinary piece into something extraordinary.
Selecting the perfect stain color is crucial, as different wood species absorb stains in unique ways, influencing the final outcome significantly.
To begin the staining process, ensure the stain is well-stirred to achieve a consistent color. Using a brush or cloth, carefully apply the stain along the grain, allowing it to seep into the wood. For a more pronounced color effect, consider applying multiple layers of stain to emphasize the intricate patterns and add a personalized touch that accentuates the wood's natural attributes.
Once you achieve the desired color intensity, allow the stain to dry thoroughly. Subsequently, applying clear coats is essential to safeguard your work. Opt for a clear satin top coat to not only enhance durability but also amplify the wood's sheen without overshadowing its innate beauty.
Removing Excess Stain
When removing excess stain from floating wood shelves, it's essential to have the right tools and use proper wiping techniques. A clean rag is the primary tool for this task.
After allowing the stain to sit for a few minutes, gently wipe the wood in the direction of the grain. This method ensures an even removal of excess stain, preventing blotches and allowing the natural beauty of the wood to stand out.
It's a simple yet effective way to achieve a professional finish on your floating wood shelves.
Tools for Stain Removal
When it comes to finishing floating wood shelves, having the right tools is crucial for achieving a professional and polished look. Let's explore the top three tools you'll need for this task:
- Microfiber Cloths: These are essential for wiping off any excess finish on the wood shelves. Their ultra-soft and absorbent material ensures a smooth and even application, preventing any scratches on the surface.
- Nitrile Gloves: Protecting your hands with nitrile gloves is a must when working with finishing products. These gloves provide a barrier between your skin and the finish, keeping your hands clean and free from any potential irritation.
- Ventilation Mask: Ensuring proper ventilation in your workspace is key to staying safe while applying finish to your floating wood shelves. A ventilation mask will help filter out any harmful fumes, keeping the air you breathe clean and safe.
Proper Wiping Techniques
Let's now focus on mastering the correct wiping techniques to eliminate excess stain and achieve a flawless finish on your floating wood shelf. Once the stain has been applied and allowed to sit for 3-5 minutes, the next crucial step is to grab a clean rag and start wiping off the excess. This step isn't just a routine task; it's a pivotal moment in preserving the natural beauty of the wood and ensuring a consistent aesthetic appeal.
It is vital to wipe in the direction of the wood grain. This approach not only highlights the natural grain of the wood but also prevents any patchiness or uneven color distribution. Proper wiping techniques play a key role in achieving that smooth, uniform finish that sets our floating shelf apart.
After meticulously removing the excess stain, it's essential to let the shelf sit overnight in a well-ventilated area. This allows the stain to set properly before applying the clear coat, sealing in the wood's natural beauty and strength.
Applying a Clear Finish
Before diving in, ensure you have chosen a top-notch clear finish to truly bring out the natural beauty of your floating wood shelf. A clear finish not only amplifies the inherent charm of the wood but also provides crucial protection against scratches, moisture, and UV damage, extending the shelf's lifespan.
Let's break down the process:
- Preparation: Start by sanding the shelf surface with fine-grit sandpaper to ensure a smooth finish. Wipe away all dust and debris with a tack cloth to achieve a flawless result.
- Application: Utilize a high-quality brush to apply a thin layer of clear finish, following the wood grain's direction. This step is key to highlighting the natural grain and achieving a consistent sheen.
- Drying and Sanding: Allow the first coat to dry completely, typically within 24 hours. After drying, lightly sand the surface with fine-grit sandpaper to eliminate any imperfections, and clean off the dust before applying subsequent coats.
Each coat of clear finish not only enhances the wood's visual appeal but also eases cleaning and maintenance by preventing stains and scratches. By meticulously following these steps, we ensure that our floating wood shelf maintains its elegance and functionality for years to come.
Types of Clear Coats
Now that we've covered how to apply a clear coat, let's delve into the various types of clear coats that can enhance your floating wood shelf, especially our Minwax Dark Walnut shelves. Each type offers distinct advantages to ensure your shelves not only look stunning but also stay well-protected.
Polyurethane clear coats are excellent for bringing out the natural grain of the wood and providing a durable finish. They create a tough, protective layer that safeguards the shelf against moisture, scratches, and UV damage.
Water-based clear coats are a great choice for those who prioritize eco-friendliness. These coatings offer a crystal-clear finish that allows the wood's beauty to shine through. They dry quickly and emit fewer fumes, making them perfect for indoor projects.
For a glossy, modern look, acrylic clear coats are a fantastic option. They dry rapidly and leave a sleek finish that enhances the wood's natural beauty, perfect for creating a contemporary feel for your floating shelves.
If you're looking for superior durability and a rich finish, oil-based clear coats are the way to go. These coatings bring out the natural colors of the wood, especially enhancing the luxurious appearance of Dark Walnut shelves. They're ideal for high-traffic areas, as they can withstand wear and tear effectively.
Wipe-On Polyurethane
To achieve a smooth and durable finish for your floating wood shelf, consider using Wipe-On Polyurethane. This clear coating method enhances the natural beauty of the wood grain while providing excellent protection against scratches, stains, and moisture.
Applying Wipe-On Polyurethane is a simple and efficient process, requiring only a clean rag to ensure a smooth and even coat.
Wipe-On Polyurethane is favored for its ease of application, as it eliminates the need for brushes or sprayers, making the finishing process quick and straightforward. Additionally, this finish offers enhanced durability, drying quickly and allowing for additional layers to increase protection and create a glossy sheen.
By accentuating the wood grain, Wipe-On Polyurethane showcases the inherent elegance of the wood, adding a touch of natural beauty to your floating shelves.
Drying and Curing Time
When applying Wipe-On Polyurethane to our floating wood shelf, understanding the drying and curing times is crucial to achieve the best results. The stain typically takes 6 to 8 hours to dry, allowing for deep penetration and enhancing the wood's natural color.
However, the polyurethane requires more patience to create a durable, protective layer. The curing process for polyurethane can take up to 24 hours, crucial for adding an elegant and long-lasting finish to our shelf.
Adequate ventilation is essential during both drying and curing to ensure a smooth and even coat, which is vital for achieving a high-quality end result.
It's important to consider the impact of humidity levels on drying and curing times. Lower humidity speeds up the process, while higher humidity can prolong it. Monitoring the environment is key to managing these factors effectively.
Following the manufacturer's instructions is essential to achieve a professional-grade finish that highlights the wood's natural grain and provides lasting protection.
Final Touches and Maintenance
As we finalize our project, let's focus on the essential tools and products needed to maintain our floating wood shelves.
Regular dusting and periodic deep cleaning are crucial to preserve their appearance, while applying a transparent protective coating helps shield the wood from scratches and UV damage.
Applying Protective Coating
Applying a clear finish not only protects our floating wood shelf but also enhances the natural beauty of its grain. Adding this protective layer ensures the shelf remains resistant to scratches, moisture, and UV damage, preserving the wood's aesthetic appeal and extending its lifespan.
To effectively apply the clear finish, follow these steps:
- Preparation: Begin by lightly sanding the shelf to create a smooth surface for the finish to adhere to. Ensure that all dust and debris are removed to prevent any imperfections in the final result.
- Application: Use a high-quality brush or cloth to apply the clear finish in thin, even coats, following the natural grain of the wood. Allow each coat to dry completely before applying the next layer.
- Final Touches: Once the final coat has dried, gently sand the surface with fine-grit sandpaper to achieve a smooth and professional finish. Clean off any dust particles to reveal the enhanced grain and sheen of the wood.
Routine Cleaning Tips
To maintain the pristine condition of our floating wood shelf, we need a few essential tools. A soft, clean, dry cloth is perfect for regular dusting to keep surface debris at bay. This simple step not only retains the shelf's appearance but also prevents dust from settling into the wood grain, particularly if the shelf boasts a walnut stain that highlights its natural beauty.
For a deeper clean, a mild soap and water solution is ideal for gently wiping the surface. Remember not to soak the wood; a damp cloth is all you need. Avoid harsh chemicals or abrasive cleaners as they can harm the finish and alter the shelf's inherent charm.
Periodically, applying a wood conditioner or oil nourishes the wood, maintaining its vibrancy and preserving its sheen. This upkeep not only extends the shelf's lifespan but also ensures the walnut stain remains luxuriant and appealing.
Frequently Asked Questions
How to Enhance Natural Wood Grain?
Enhancing the natural wood grain on floating wood shelves involves starting with wood conditioning and using sanding techniques to create a smooth surface. By applying a grain filler, the texture of the wood can be highlighted, ensuring that the beauty of the wood truly stands out.
To achieve this, it is important to have the right tools such as a quality wood conditioner, sandpaper with different grits for sanding, and a grain filler that matches the color of the wood. These tools will help bring out the unique characteristics of the wood grain, giving your floating wood shelves a polished and refined look.
What Finish Brings Out Wood Grain?
"A stitch in time saves nine. Utilizing wood stain, proper sanding techniques, and grain filler is essential for enhancing the natural beauty of wood grain on floating wood shelves. This approach not only brings out the intricate patterns and textures of the wood but also ensures a stunning and innovative finish that will impress anyone who sees it."
What Is the Best Varnish to Bring Out Wood Grain?
To bring out the natural beauty of wood grain on floating wood shelves, it's best to use a satin varnish. This type of varnish provides a subtle sheen that enhances the wood's patterns without being too glossy. Before applying the varnish, make sure to properly prepare the wood surface by sanding it smooth and removing any dust or debris. This will ensure a flawless finish that truly showcases the wood's unique characteristics.
When it comes to application, using the right tools is key. Opt for a high-quality brush or a foam applicator to evenly coat the wood with varnish. Take your time and apply thin, even layers, allowing each coat to dry completely before adding the next one. This will help prevent any streaks or uneven spots in the finish, giving your floating wood shelves a professional look.
How Do You Finish Wood Floating Shelves?
To finish wood floating shelves, we start by using sandpaper to smooth the surface, ensuring a sleek and even texture. Following this, we meticulously prepare the shelves, making sure to remove any dust or debris that could affect the final finish. This step is crucial to achieving a professional look.
After the preparation is complete, we apply a clear satin top coat to the shelves. This top coat serves as a protective layer, shielding the wood from damage and wear over time. Additionally, the clear satin finish enhances the natural grain of the wood, bringing out its beauty and character.
Conclusion
We've covered the steps to enhance the natural grain of a floating wood shelf using a clear finish. By carefully selecting the appropriate wood, examining its grain, and thoroughly preparing our workspace, we've set the foundation for a flawless result.
Sanding with the correct grits, applying a high-quality clear coat such as wipe-on polyurethane, and allowing sufficient drying and curing time are essential for achieving a remarkable outcome.
By adding final touches and implementing regular maintenance, our shelf will continue to captivate as a striking focal point for years to come.